
Your college student is back at school, and you’re feeling good. You helped your child get their young adult Power of Attorney form completed over the holidays and you’re set.
Your form is signed and ready to go. But where do you store it? And how do you get it to a doctor or other professional when you need it?
These are common questions people ask Mama Bear Legal Forms after completing their young adult power of attorney package.
Now, we’re happy to say that our new, FREE Mama Bear app lets you scan, store and share your POA forms with ease!
Why would I need to email my Power of Attorney?
Your POA form is your proof of authority to make legal, financial, and health care decisions for your adult child. Unlike a will, the original, signed copy of a POA is not necessary to prove your authority to make decisions for your adult child.
Most people store their POA forms and other legal documents in a safe or file cabinet at home. While this is wise, it’s not accessible in an emergency.
That’s why we created our new, free app to scan, store and share your POA forms.
How to Scan, Store and Share Your Power of Attorney Forms With the Mama Bear App
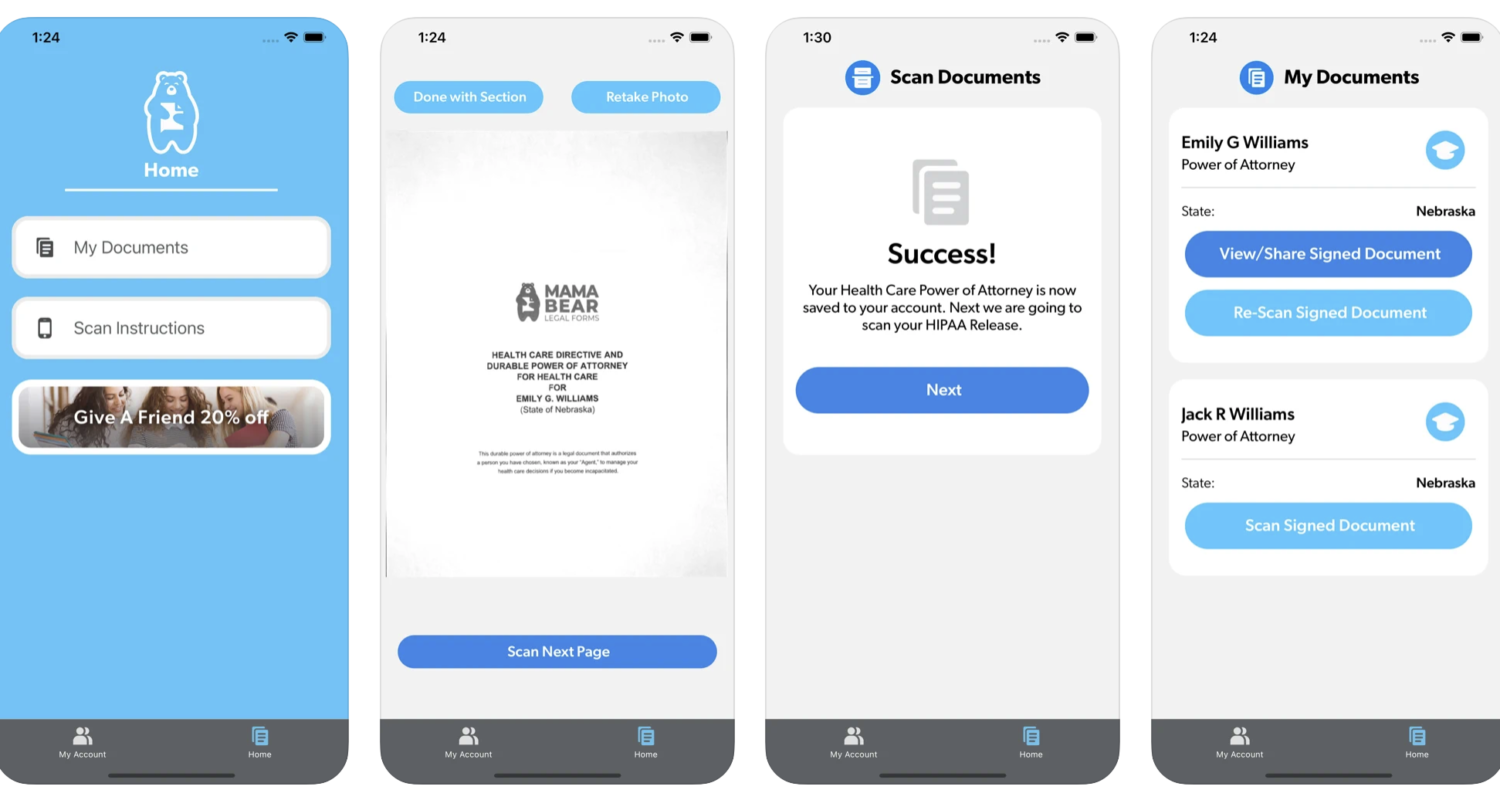
Using the app is easy. First, download the free Mama Bear app from the Apple Store or Google Play. When you open the app for the first time, you will be prompted to enter the email that you used to create your POA or will with Mama Bear. After entering your password, you will see the home screen, where you can view your saved documents and begin scanning them.
Pressing the “My Documents” button opens a screen where you can select the form you want to scan
Then, click the “scan signed documents” button.
Mama Bear walks you through the scanning process with five simple, step-by-step instructions.
Step 1
The first thing you will do is find the first and last page of each of the three sections of your young adult power of attorney document so that you can scan them separately:
- Health Care Power of Attorney
- HIPAA Release
- Financial Power of Attorney
You won’t need to scan the cover sheet, contents page or instructions, so set those pages aside. After separating your sections, you’re ready for step two.
Step 2
Scan the first page of your Health Care Power of Attorney. For a good, clear scan, separate each page you are scanning from the stack of pages.
Hold your phone at least 12 inches above the page.
The app will automatically find the corners of the page. Once it does, you can tap the button to take a photo, or if you wait a few second, the app will take it for you.
Now you are ready for step three.
Step 3
Continue scanning each page of your Healthcare POA document. If you need to retake a photo, tap the “Retake Photo” button in the upper right-hand corner.
Step 4
When you have scanned the last page of your document, tap the “Done with Section” button in the upper left-hand corner of your phone.
The Mama Bear app will prompt you to begin scanning your HIPAA release. You will repeat step three for that document and your Financial POA.
Then, you’re ready for the final step.
Step 5
After scanning your Financial Power of Attorney form, the app will save your images and take you to the “My Documents” page to view or share your documents.
If you make changes to a document in the future, you can rescan your documents at any time.